A treatment plan turns a diagnosis into an agreed course of care: an ordered list of services — consultations, procedures, therapies, follow-ups — each with its own priority, timing, and estimated cost. A clinician on the patient's care team builds the plan, sends it to the client for a signature, and once it is accepted the plan schedules the work for you. It gives everyone a shared, written picture of what will happen, in what order, and what it will cost.
Treatment plans live inside the Diagnostics workspace, so you need the Diagnostics feature enabled and permission to create plans. Only clinicians on the patient's care team (or staff allowed to view all patients) can open and edit a patient's plans.
Step 1 — Access treatment plans
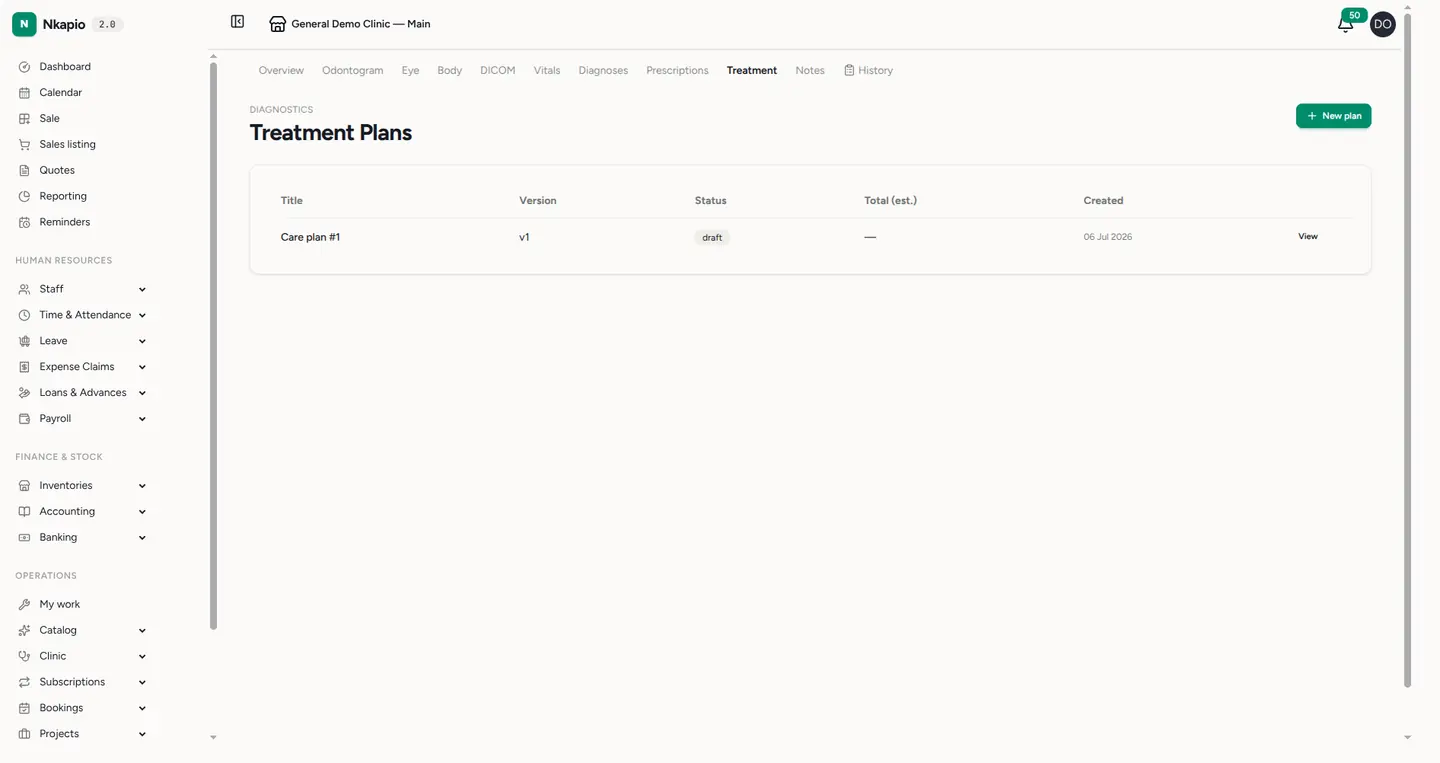
Navigate to Diagnostics → Patients. Click a patient and then the Treatment Plans tab. The list shows each plan's title, version, status, estimated total, and creation date.
Step 2 — Create a new plan
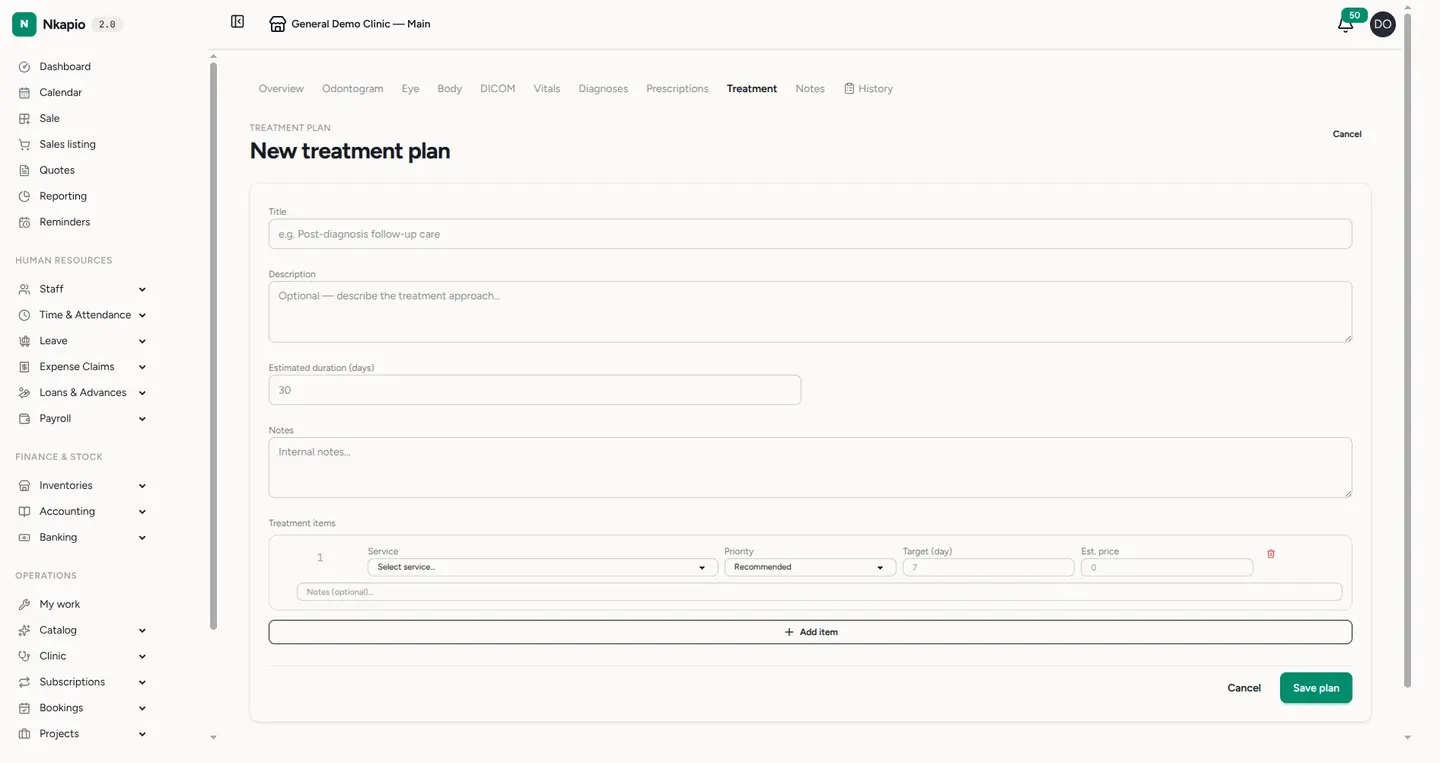
Click New plan and fill in the plan header:
- Title: the name of the care pathway (e.g., "Post-diagnosis follow-up care").
- Description: an optional summary of the treatment approach.
- Estimated duration (days): the expected timeline for the whole plan.
- Notes: internal notes that stay with the plan.
A new plan is created as a draft, and it is automatically linked to the patient — and to the diagnosis, when you start the plan from a diagnosis.
Step 3 — Add treatment items
A plan needs at least one item before it can be saved. Each item is one service to be delivered, with:
- Service: the catalogue service to perform.
- Priority: Required, Recommended, or Optional — a clinical signal of how essential the step is.
- Target (day): how many days from the plan's start this step should happen. Leave it blank to fall back to a default of one week out.
- Est. price: the expected cost of that step. The plan's estimated total is the sum of its items.
- Notes: any per-step detail.
Add as many items as the pathway needs, then click Save plan. Items keep the order you enter them, and that order carries through to the client's proposal and to scheduling.
Step 4 — Propose the plan to the client
While a plan is a draft you can edit it freely. When it is ready, open the plan and click Propose to client. You choose how the proposal reaches the client — in person, or by another delivery channel — and how long the request stays valid (72 hours by default).
Proposing takes a snapshot of the items and their total, generates a signature request, and moves the plan to Proposed. From this point the plan is locked: the Edit and Propose actions are only available on a draft, so a plan that is out for signature cannot be changed underneath the client. The plan page shows a "Waiting for client signature" notice until the client decides.
Step 5 — Acceptance schedules the work
When the client signs, Nkapio reconciles the decision automatically:
- Accepted — the plan moves to Accepted and a draft booking is created for every pending item, in the scheduling workflow, on the item's target date (or its day-offset from today, or one week out if neither is set). Each item is linked to its booking and marked Scheduled. From there you confirm and run the bookings like any other appointment.
- Declined — the plan moves to Declined, together with the reason the client gave. Nothing is scheduled.
Item and plan status at a glance
- Item statuses: Pending → Scheduled (once a booking exists) → Completed, or Skipped / Cancelled.
- Plan statuses: Draft → Proposed → Accepted or Declined, plus In progress, Completed, and Cancelled for tracking the plan through delivery.
Due-date reminders
Every morning Nkapio scans for plan items whose target date is 48 hours away and are still open (pending or scheduled). The plan's creator gets a reminder for each one, so upcoming steps don't slip.
Tips & common questions
- Nothing scheduled after acceptance? Bookings are only generated for items that are still pending at the moment the client accepts — items already skipped or cancelled are left out.
- Need to change an accepted plan? Editing is reserved for drafts. Rather than altering a signed plan, create a new plan (it carries its own version) for the revised course of care.
- Who gets the reminder? The person who created the plan, not the whole care team.
- What sets the appointment date? The item's explicit target date wins; otherwise the day-offset from the start date is used; otherwise the step is placed one week out.